
This article will review the steps to setup a Virtual Event in Registration. Virtual Event Registration allows you to include either ZOOM, GO-TO MEETINGS or WEBEX links and information within the registration process. Once the registration is submitted, the virtual event information you enter in the setup process will be EMAILED within the confirmation the registrant receives along with a CALENDAR INVITE that they can accept. This Calendar Invite contains the virtual link, ID and Password as well as automatically creates a reminder in their calendar on the specific date and time you provide in the Event Information.
Step 1- ENABLE VIRTUAL EVENT:
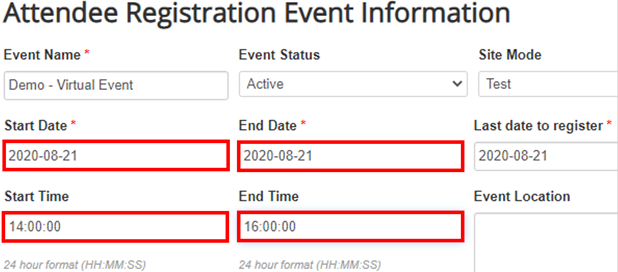
1. Click on the EVENT INFO tab.
2. Enter Start Date, End Date, Start Time and End Time (*it is crucial to enter this data correctly, as the database pulls from these fields to create the calendar invite and Virtual link Information)
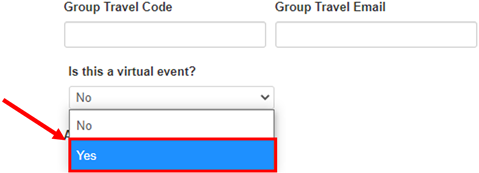
3. Scroll further down the Form and select YES for "Is this a virtual event?":
4. Hit Save at the bottom of the form.
Step 2- ENTER VIRTUAL LINK INFORMATION:
1. You should still be on the EVENT INFO tab.
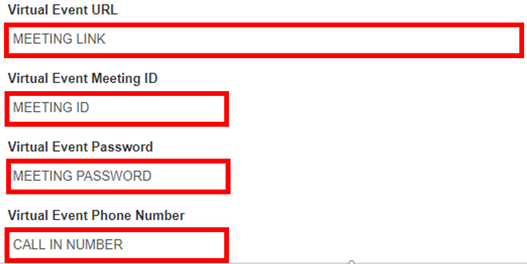
2. Scroll further down on the form and Enter your Virtual Event Information IN ONE OF TWO WAYS:
- FIRST WAY- Manually, by entering into each field below:
- SECOND WAY (recommended)- Click on Get Zoom Information *you will need a Zoom account for this option, but it takes care of the calendar invite and confirmation for you and you can skip Step 3:
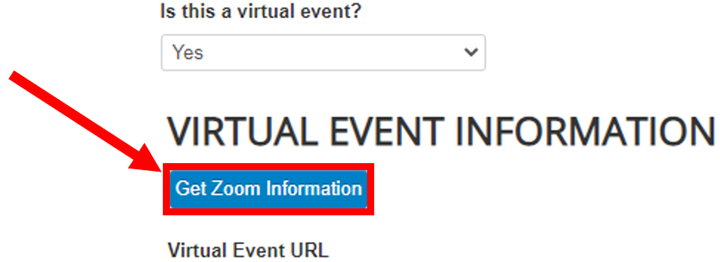
NOTE: ME Registration speaks to Zoom under your account, if you are not logged in, it will prompt you first for a Zoom log-in before creating a Zoom link for your event. Also to edit this meeting, you just log-in to your Zoom Account and go to MY MEETINGS. You will see this event listed and can update any settings there.
3. Hit Save at the bottom of the form.
Step 3- UPDATE CONFIRMATION: - **If using Zoom integration (GET ZOOM INFORMATION above), then Confirmation will automatically update for you with Calendar Invite text and your setup is complete. Otherwise if you entered your Virtual Link Information manually, you will need to update the confirmation as follows:
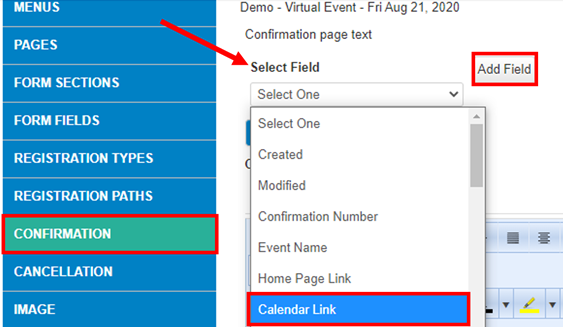
1. Go To SETUP -> CONFIRMATION
2. Add a Calendar Link option to the confirmation email. Remember, this calendar invite pulls the Dates and Times from the Event Info Tab you set up at the beginning. Use the SELECT FIELD drop down to select the Calendar Link field and then hit Add Field, this will drop it where your cursor is located in the confirmation text:
It will look like this when successfully inserted: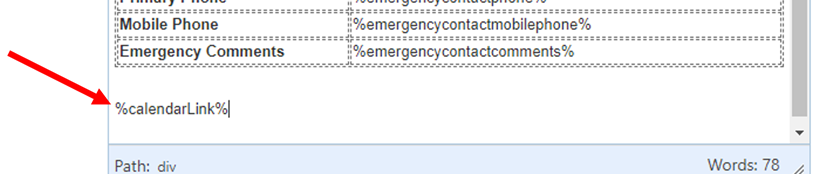
Here is a Sample Confirmation with Calendar Invite: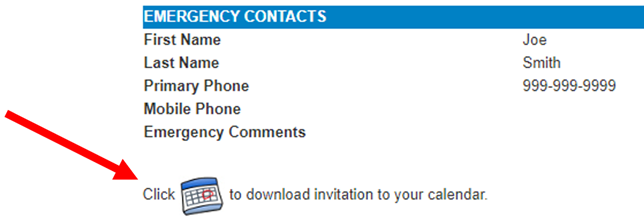
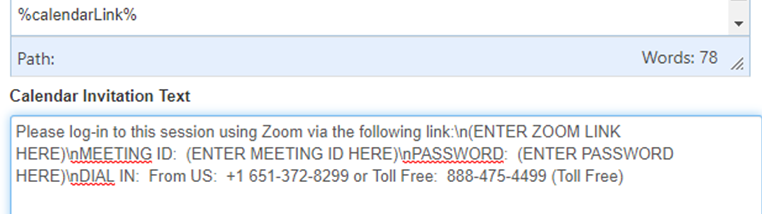
3. Add Calendar Invitation Text. This will go in the Calendar Invitation Text section below the confirmation email text area. " \n" serves as a page break. "\n\n" is a double page break. See below example:
The format will look like this:
Please log-in to this session using Zoom via the following link:\n(ENTER ZOOM LINK HERE)\nMEETING ID: (ENTER MEETING ID HERE)\nPASSWORD: (ENTER PASSWORD HERE)\nDIAL IN: From US: +1 651-372-8299 or Toll Free: 888-475-4499 (Toll Free)
On the actual Calendar Invite, it will look like this:
Please log-in to this session using Zoom via the following link:
(ENTER ZOOM LINK HERE)
MEETING ID: (ENTER MEETING ID HERE)
PASSWORD: (ENTER PASSWORD HERE)
DIAL IN: From US: +1 651-372-8299 or Toll Free: 888-475-4499 (Toll Free)
Comments
0 comments
Article is closed for comments.